| 
* Take your time and find out how to make PhotoMontage in Adobe Photoshop and to see some compares between PhotoMontages and original pictures. We will also explain some of the basic techniques that you need to know if want to make your own photo fake.
* If you have some working problems or questions about Photoshop or other photo-edit aplications, mail us to: fotomontazer@gmail.com. We'll try to solve your problem(s) and mail you answer as quickest as we can. |
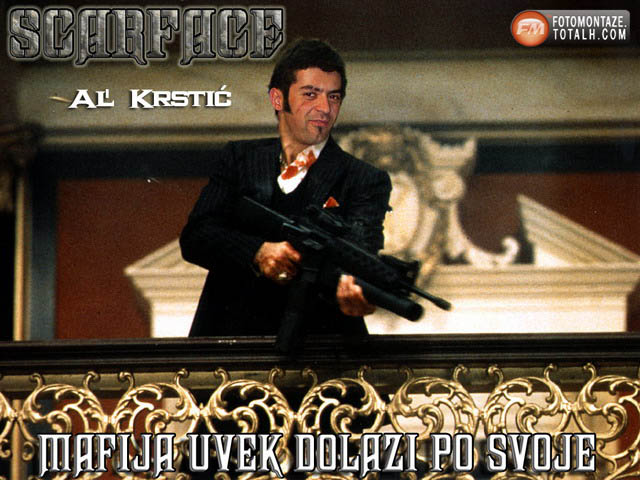
ILLUSTRATION 1: "SCAR FACE" - Photomontage with Adobe Photoshop *
Demonstration of photomontage in 9 steps...
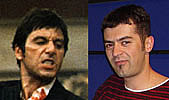 1. Before all, imagine your photomontage and find and compare original picture with body part (head in our case) you want to replace on original. For good fake you must find body parts shooted from angle alike to original. Choosing good pictures is the half of the job, so always make shure that your find same (or near same) angle, as we show on our exemple pic. on right.. 1. Before all, imagine your photomontage and find and compare original picture with body part (head in our case) you want to replace on original. For good fake you must find body parts shooted from angle alike to original. Choosing good pictures is the half of the job, so always make shure that your find same (or near same) angle, as we show on our exemple pic. on right..
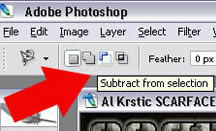 2. First step is to cut body part we want add to original. Always make selection before resize to avoid quality loss. For selection use "Lasso Tool" from tools palette (keyboard shortcut "L"). Make your selection (better larger than less) and if needed, use all of 3 "Lasso Tools", plus compulsorily "add" and "substract" to/from selection on tool extra palette under main menu (under "Image" and "Layer"). When finished, use "Move Tool" from Tools Palette (keyboard "V") and just drag and drop selection to original picture (copy if format is GIF). From now on that will be your most important layer. 2. First step is to cut body part we want add to original. Always make selection before resize to avoid quality loss. For selection use "Lasso Tool" from tools palette (keyboard shortcut "L"). Make your selection (better larger than less) and if needed, use all of 3 "Lasso Tools", plus compulsorily "add" and "substract" to/from selection on tool extra palette under main menu (under "Image" and "Layer"). When finished, use "Move Tool" from Tools Palette (keyboard "V") and just drag and drop selection to original picture (copy if format is GIF). From now on that will be your most important layer.
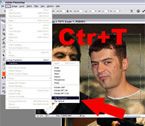 3. To resize our new layer use "free transorm" (keyboard shortcut Ctr+T) or in main menu Edit/ Transform/Free transform. While changing dimensions hold down Shift on keyboard for constant proportions. If needed use "Flip Horizontal" or "Flip Vertical" options under Edit/Transform menu. 3. To resize our new layer use "free transorm" (keyboard shortcut Ctr+T) or in main menu Edit/ Transform/Free transform. While changing dimensions hold down Shift on keyboard for constant proportions. If needed use "Flip Horizontal" or "Flip Vertical" options under Edit/Transform menu.
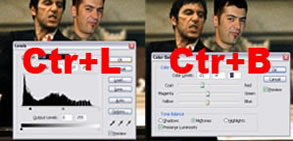 4. When finished resizing, next step wil be exposure and color corrections. You must set layer color, brightness and contrast (skin color in our case) as near as you can to original. For that corrections use "Levels" (Image/ Adjustment/ Levels, or keyboard shortcut Ctr+L) and "Color Balance" (Image/ Adjustment/ Color Balance, keyboard shortcut Ctr+B). There are lots of great image correction tools under Image/ Adjustment menu, so take your time and try each of them. 4. When finished resizing, next step wil be exposure and color corrections. You must set layer color, brightness and contrast (skin color in our case) as near as you can to original. For that corrections use "Levels" (Image/ Adjustment/ Levels, or keyboard shortcut Ctr+L) and "Color Balance" (Image/ Adjustment/ Color Balance, keyboard shortcut Ctr+B). There are lots of great image correction tools under Image/ Adjustment menu, so take your time and try each of them.
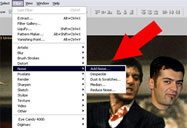 5. If you make photomontage from some film wallpaper or poster, notice that most of that pictures have photo noise or grain. That is the movie effect. If you want good fake, your montage must be realy close to original so you must add grain. Go to "Filter" menu ("Filter/Noise/ Add Noise") and add grain as you like (as on original). On the web you can find lots of Photoshop plugins that can better solve this problem, but I think this is nice solution for start. 5. If you make photomontage from some film wallpaper or poster, notice that most of that pictures have photo noise or grain. That is the movie effect. If you want good fake, your montage must be realy close to original so you must add grain. Go to "Filter" menu ("Filter/Noise/ Add Noise") and add grain as you like (as on original). On the web you can find lots of Photoshop plugins that can better solve this problem, but I think this is nice solution for start.
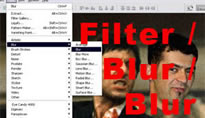 6. Beside "grain" on many pictures you will find blured or parts that are out of focus (Depth Of Field effect). In that case add blure to you editing layer from "Filter" menu (Filter/Blur/Blur), as much as you like. In Photoshop CS2 you'll find 11 different blure effects. They may be similar but try to find out there difference. 6. Beside "grain" on many pictures you will find blured or parts that are out of focus (Depth Of Field effect). In that case add blure to you editing layer from "Filter" menu (Filter/Blur/Blur), as much as you like. In Photoshop CS2 you'll find 11 different blure effects. They may be similar but try to find out there difference.
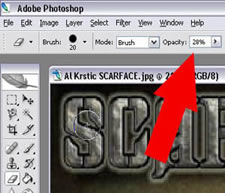 7. Now is time to maybe most important part. Eresing needless edges of your layer. Great trick is to duplicate your layer by selecting it in layers palette on right and pressing Ctr+J, and to make that copy invisible (eye icon on layers palette) just in case that something go wrong with erasing. Of course, I supposte that you're set your layer positin to final. For eresing use "Erese Tool" (logicaly) from tools manu, and offen use different brushes from right click menu on work area. Don't miss "Opacity" setings for Erese tool in extra tool palette under main menu. With eresing edges with opacity less than 10% you'll get fake picture that is realy true equalent. 7. Now is time to maybe most important part. Eresing needless edges of your layer. Great trick is to duplicate your layer by selecting it in layers palette on right and pressing Ctr+J, and to make that copy invisible (eye icon on layers palette) just in case that something go wrong with erasing. Of course, I supposte that you're set your layer positin to final. For eresing use "Erese Tool" (logicaly) from tools manu, and offen use different brushes from right click menu on work area. Don't miss "Opacity" setings for Erese tool in extra tool palette under main menu. With eresing edges with opacity less than 10% you'll get fake picture that is realy true equalent.
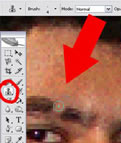 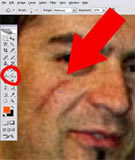 8. For extra details like in our case eyebrow erese use "Clone Tool" (keyboard shortcut "S"), or for drawing scar on face "Burn, Dodge and Spoonge" tool (keyboard shortcut "O"). These tools are very handsome so try to learn them well. 8. For extra details like in our case eyebrow erese use "Clone Tool" (keyboard shortcut "S"), or for drawing scar on face "Burn, Dodge and Spoonge" tool (keyboard shortcut "O"). These tools are very handsome so try to learn them well.
9. At the end add some text comment if you wish or just change existing. The "Clone" tool will mostley solve you any problem with changing original text or picture parts you dont want. For someone PhotoMonage may be closer to art without any comment, but that's another story.
** So, from "Scar FAce" wallpaper with Al Pacino im main roll we got "Scar Face" with Alexandar Krstich in main roll. Isn't he bad?
* Good luck with your Photomontages!
>> top >>
>> next page >>
Copyright 2006-2010 © Fotomontaze. All rights reserved. | Web design: ARTerEgo |
